Step 1: Understanding the Facebook Pixel
Let’s get started by understanding the Facebook Pixel and what it can do for your WordPress website.
The Facebook Pixel is a snippet of code for your website which allows you to measure, optimize, and build the kinds of users that come to visit. (For more information on the Facebook Pixel, click here.)
With this information, you can create effective ad campaigns, boost your website traffic and increase conversions.
Step 2: Finding your Facebook Pixel
Now that you have an idea of the potential of the Facebook Pixel, it’s time to put it to use.
First, you have to sign in to your Facebook Ads Manager account.
Next, click on Pixels.
![]() Then, click Create a Pixel. After clicking this, you will be prompted to name your pixel. The name could be your business or product.
Then, click Create a Pixel. After clicking this, you will be prompted to name your pixel. The name could be your business or product.
![]() After clicking continue, you will receive a message revealing your unique Pixel ID.
After clicking continue, you will receive a message revealing your unique Pixel ID.
Getting this far gives you two choices, you can either email your pixel to your WordPress developer or obtain your pixel and manually install it to your WordPress website.
![]()
![]() Click on Install Pixel Now and copy and paste your Pixel code.
Click on Install Pixel Now and copy and paste your Pixel code.
![]()
![]() Once copied, head over to your WordPress admin panel.
Once copied, head over to your WordPress admin panel.
Step 3: Install the Facebook Pixel Onto Your WordPress
The Facebook Pixel needs to be installed before the </head> in your WordPress theme.
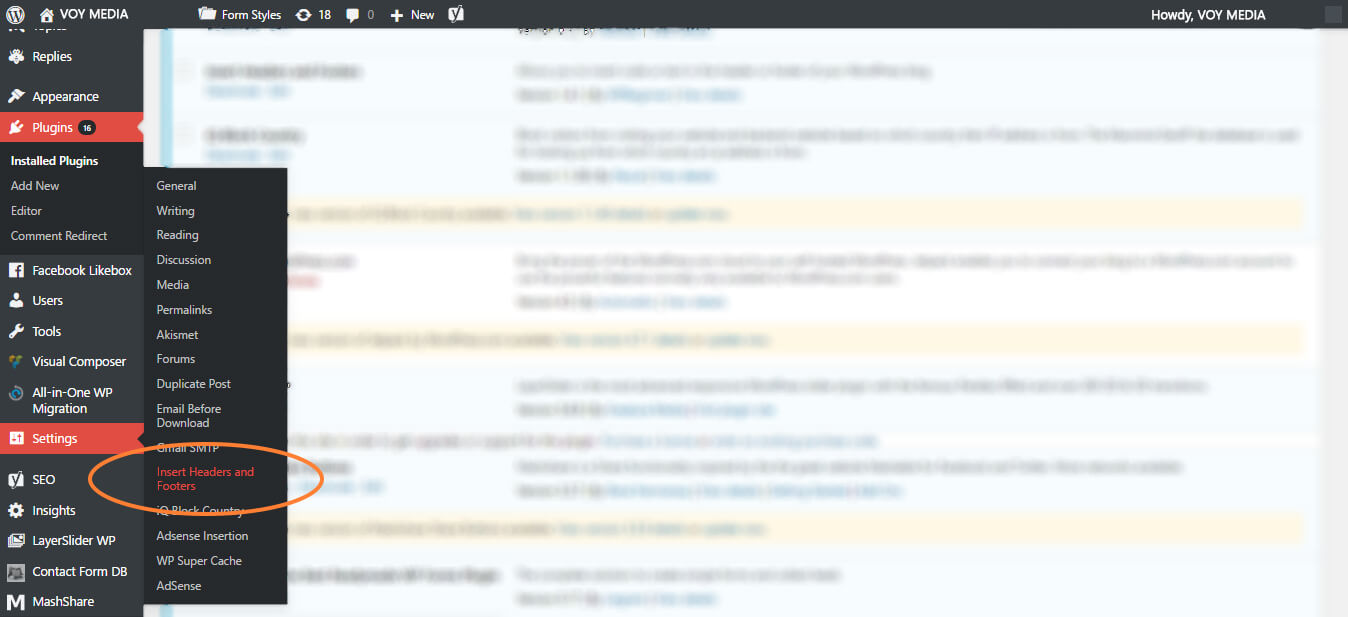
Use the Insert Headers and Footers Plugin for a quick and easy way to do this. Once the plugin is installed and activated, go to Settings >> Insert Headers and Footers.
 Once here, you can paste the Pixel code into the Headers section then click save.

Congratulations. You have successfully installed your Facebook Pixel onto your WordPress website!
BONUS STEP: Facebook Pixel 101
Now that your Facebook Pixel is installed on your WordPress website, you will want to know what it is you can do with it.
Start by creating Custom Audiences which allows for retargeting campaigns on Facebook.
Return to your Ads Manager account and click on Ads Manager >> Audiences located in the top left top corner.
Then, click Create Audience >> Custom Audience.
A popup will appear providing a series of choices. You can choose, Customer File, Website Traffic, App Activity, Engagement on Facebook. For the sake of this tutorial, select Website Traffic.
A new popup will appear with various options to create a custom audience. Start by choosing your audience based on the traffic to your website.
Next, select the website you will be tracking.
Then, select the duration for this audience.
Finally, create a name for your audience and click Create Audience.
You have just created your first custom audience.
From here, you may want to learn How to Effective of Remarket and Retarget with the Facebook Pixel.
The post How to Install the Facebook Pixel In WordPress appeared first on Facebook Advertising Agency | Facebook Marketing Company.
from
https://voymedia.com/facebook-pixel-wordpress/
No comments:
Post a Comment